Your main stop tap is the one valve that shuts off the whole house. When it leaks or seizes solid, a burst pipe becomes a flood. Here is why stopcocks fail, how to free a stiff one gently, how to stop a weeping spindle, and how to fall back on the external stop valve.
The main stop tap, or stopcock, is the single most important valve in your home, and the one most people never touch until the day they desperately need it. It is the master switch for your cold water supply. Turn it off and, within a minute or two, every tap and pipe in the house runs dry. That is exactly what you want when a pipe bursts, a flexible hose fails under the sink, or a washing machine connection lets go at two in the morning.
The problem is that a valve which sits untouched for ten or twenty years does not stay in perfect working order. It corrodes. The internal washer hardens. The gland packing around the spindle dries out and starts to weep. And in a lot of older London homes, the first time anyone tries to close the stopcock in an emergency, it either will not budge or it snaps. Suddenly a manageable leak becomes an uncontrolled flood, because the one thing that would have stopped it has failed.
This guide explains why stop taps leak and seize, how to free a stiff one without breaking it, how to deal with a weeping spindle, when the valve is beyond saving and needs replacing, and how to find and use the external boundary stop valve as a backup. Most importantly, it explains why you should test your stopcock now, on a calm ordinary day, rather than discovering it is seized when water is already coming through the ceiling.
What the stopcock actually does
Your home has one internal stop tap that controls the incoming mains cold water. In a house it is very often under the kitchen sink, though it can also be in a downstairs cloakroom, a utility room, under the stairs, in an airing cupboard, or near the front door. In a flat it can be harder to track down, sometimes shared, sometimes hidden behind a kitchen unit or in a communal riser cupboard. If you are not certain where yours is, read our guides on how to turn off your water at the stop tap and, for flats specifically, how to find the stopcock in a flat before you go any further. Knowing the location is step one; knowing that it works is step two.
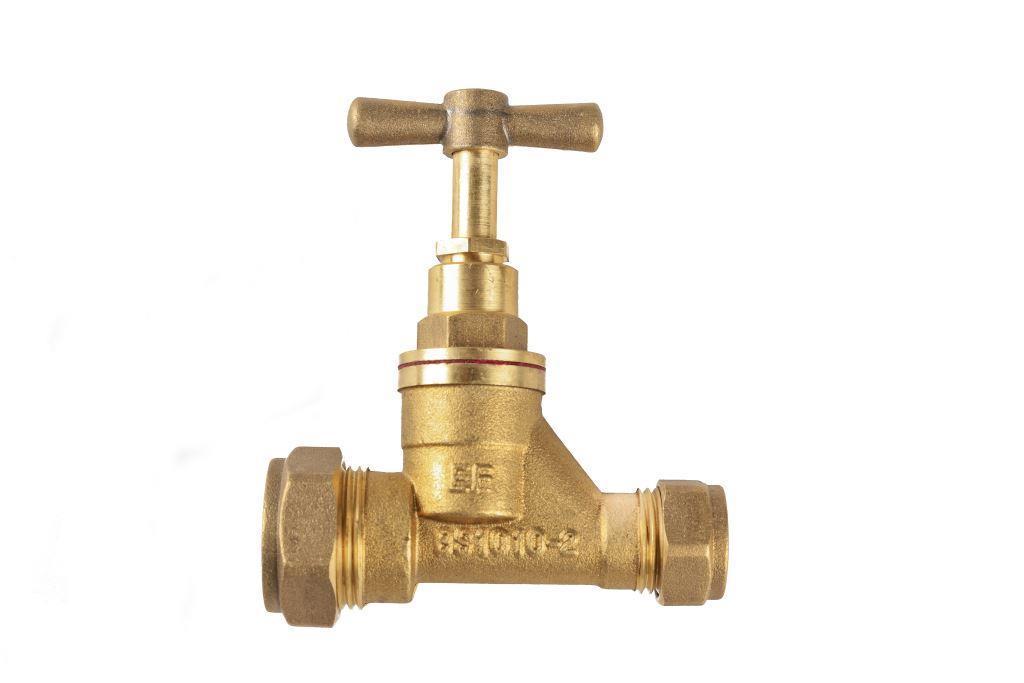
A traditional stopcock is a screw-down valve. When you turn the handle clockwise, a spindle pushes a rubber or fibre washer down onto a brass seat inside the body, closing off the flow. Turn it anticlockwise and the washer lifts, letting water through. Around the spindle there is a seal, usually called the gland, which stops water escaping up past the handle. Every one of these parts can wear, corrode, or dry out over time, and each failure shows up differently.
Why stop taps leak
A leaking stopcock nearly always leaks from one of two places, and it matters which, because the fix is different.
Leaking from the spindle (the gland)
If you see water weeping out from around the spindle, usually appearing when the valve is open or being turned, the gland packing has failed. The gland is the seal where the spindle passes through the top of the valve body. On older stopcocks it is a ring of greased packing material compressed by a gland nut. Over years of sitting still, that packing dries out, shrinks and hardens, and water starts to creep up past it. This is the single most common stopcock leak and, happily, often the easiest to fix.
Leaking from the body or the pipe joints
If water is coming from the joints where the stopcock meets the copper pipe, or from the body of the valve itself, the cause is usually corrosion or a failed compression joint. Old brass valves corrode from the inside, and the fittings that connect them to the pipework can loosen or degrade. This kind of leak is more serious. It often means the valve, or the joint, needs proper attention rather than a quick tweak, because a corroded body cannot be resealed reliably.
Not fully closing (passing water)
A third failure is subtler. You close the stopcock, but water still trickles through downstream. This is a worn or perished washer, or a corroded, pitted seat that the washer can no longer seal against. It is not a leak you will see on the outside, but it is a serious problem, because it means you cannot actually get a dry shut-off when you need to work on the plumbing.
Why stop taps seize
Seizing is the failure that catches people out most. A seized stopcock is one that will not turn, or turns but does nothing, or feels so tight that you are frightened to force it, which is a well-placed fear.
The root cause is almost always disuse combined with the water itself. London and much of the South East sits on hard water. Over years, limescale and mineral deposits build up inside the valve and around the thread of the spindle. Add the natural corrosion of old brass, sometimes a little dezincification where the zinc leaches out of the brass and leaves it brittle, and you get a spindle that is effectively cemented in place. A valve that is opened and closed occasionally keeps its threads clear. A valve that has not moved since the boiler was last replaced can be locked solid.
There is a second, nastier version of seizing. The valve turns freely but the washer or the internal mechanism has corroded away or detached, so turning the handle achieves nothing and the water keeps flowing. And there is the failure everyone dreads: the spindle or handle is so corroded that when you apply real force, it shears off in your hand. Now you have no way to close the valve and, depending on how it broke, possibly a new leak as well.
Why a seized stopcock is genuinely dangerous
It is easy to treat a stiff stopcock as a minor annoyance to deal with someday. It is not. The stopcock is your emergency shut-off. Its entire job is to be available on the worst day, when a pipe has split or a fitting has burst and water is pouring out under full mains pressure.
Mains pressure in London is typically strong enough to empty a great deal of water into your home very quickly. In the time it takes to find a plumber, an open pipe can flood a kitchen, bring down a ceiling, ruin flooring, and reach a neighbour's flat below. The stopcock is what buys you the crucial minutes to stop that. If it is seized when you reach for it, all of that protection is gone precisely when you need it. This is why a seized stop tap is not a someday job. It is the difference between a contained incident and a genuine flood, and it is why testing it in advance matters so much.
Symptom, cause and action at a glance
| What you see or feel | Likely cause | What to do |
|---|---|---|
| Water weeping from around the spindle when open | Dried, worn gland packing | Tighten the gland nut a little; if it persists, re-pack or replace the gland |
| Water at the pipe joints or valve body | Corrosion or a failed compression joint | Usually needs a plumber; often the valve is replaced |
| Handle turns but water still flows through | Perished washer or corroded seat | Replace the washer, or replace the valve if the seat is pitted |
| Handle will not move at all | Limescale and corrosion seizing the spindle | Free it gently (see below); do not force it |
| Handle turns far too easily and does nothing | Internal mechanism corroded or detached | Valve has failed internally; needs replacing |
| Handle or spindle snaps when turned | Brittle, corroded brass | Use the external stop valve; call an emergency plumber |
How to free a stiff stopcock, gently
If your stopcock is stiff but not leaking and you want to test or exercise it, patience is everything. The failure mode that turns a stiff valve into a broken one is impatience: someone grabs a wrench, heaves, and shears the spindle. Work slowly.
- Do this on a calm day, not during an emergency. Freeing a stiff valve is a job to attempt when nothing is leaking and you have time. If water is already escaping, skip to the external stop valve section instead.
- Try gentle hand pressure first. Grip the handle and apply steady, moderate pressure clockwise to close. Do not jerk it. If it gives even slightly, work it back and forth in small movements to break up the deposits gradually.
- Do not reach straight for a wrench. The temptation is to add leverage. On an old brass valve, leverage is what snaps spindles. If hand pressure does nothing, stop and think rather than forcing.
- Free the spindle, not just the handle. Sometimes penetrating oil or a little easing fluid applied around the base of the spindle, left to soak, then worked gently, will loosen limescale on the thread. Give it time to penetrate; do not rush it.
- Work it in both directions in small steps. Ease it a little closed, a little open, gradually increasing travel as the deposits break up. Never go from stuck to fully forced in one movement.
- Once it moves freely, exercise it fully. Turn it fully off, check the water stops at the taps, then turn it back on. Leave it a fraction of a turn back from fully open, so it does not seize in the open position again.
- If it will not move, or you hear or feel anything crack, stop. A valve that resists all gentle effort has told you it needs replacing. Forcing it risks a snapped spindle and a live leak with no shut-off.
The honest consensus you will find on DIY forums such as r/DIYUK and DIYnot is consistent on this point: gentle persuasion and patience free most stiff valves, but a genuinely seized old brass stopcock is usually living on borrowed time. Freeing it buys you function today, but many people find the sensible outcome is to have a modern lever valve fitted so the problem does not recur. Forcing a seized valve is the one thing almost everyone warns against, because the failures are expensive and always seem to happen at the worst moment.
How to fix a weeping spindle
A gland leak, water weeping from around the spindle, is often the most fixable stopcock fault, and sometimes you can improve it yourself.
- Identify the gland nut. It is the nut immediately below the handle, around the spindle. This is what compresses the packing that seals the spindle.
- Try a small tightening first. With a spanner, turn the gland nut clockwise a small amount, perhaps a quarter turn. This compresses the existing packing tighter around the spindle and often stops a minor weep completely. Do not overtighten, or the handle becomes impossible to turn and you can damage the thread.
- Test the result. Wipe the spindle dry and watch. If the weeping has stopped or greatly reduced, that may be all it needed.
- If tightening does not fix it, the packing needs renewing. The gland packing can be replaced with fresh PTFE-based packing or gland string wound into the seal, but this usually means partially dismantling the valve, which is best done with the water isolated. If you are not confident isolating the supply and reassembling the gland, this is a small, cheap job for a plumber.
A word of caution: never dismantle the gland or open the valve body while the mains is live and pressurised. If the job needs more than a light tightening of the gland nut, isolate the water first, either at this stopcock if it still closes, or at the external stop valve.
When the stopcock needs replacing
Some stopcock problems are fixes. Others are the valve telling you its working life is over. Replace, rather than repair, when:
- The body or the pipe joints are corroded and leaking, because a corroded body will not reseal reliably.
- The valve does not fully close even with a new washer, meaning the seat itself is pitted or worn.
- The handle turns freely but nothing happens, indicating the internal mechanism has failed.
- The spindle or handle has sheared, or the brass is visibly crumbling or discoloured with dezincification.
- It is a very old brass stopcock that seizes repeatedly no matter how often you exercise it.
The modern replacement most plumbers now fit is a quarter-turn lever ball valve, often as part of a combined unit that includes a drain-off. A lever valve does not have gland packing to dry out and does not screw down onto a washer, so it is far less prone to seizing and weeping. You can open or close it instantly with a quarter turn, which is exactly what you want in an emergency. Replacing a stopcock is not usually a large job, but it does require isolating the supply, and if the internal valve is the only shut-off, that means the external stop valve or a supplier isolation is needed to do the work dry. That is one reason it is worth doing as a planned job rather than an emergency.
As a rough guide, typical UK trade cost-guide ranges for replacing an internal stopcock tend to fall in the region of around 100 to 250 pounds including parts, depending on access, the condition of the surrounding pipework, and whether the supply can be isolated easily. Awkward access, corroded pipework that needs remaking, or the need to arrange an external isolation can push it higher. Treat that as an indicative range rather than a fixed quote; the honest way to price any job is to look at it first, which is why we agree the price with you before we travel rather than quoting blind.
The external stop valve: your backup shut-off
Here is the part many people never learn until they need it. Your internal stopcock is not the only shut-off. There is almost always a second valve, the external stop valve, sometimes called the boundary stopcock or the outside stop tap, out at the edge of your property.
It is usually located under a small cover in the pavement or footpath outside your home, or just inside the boundary, often near the front garden wall or gate. The cover is typically a small metal or plastic plate, sometimes marked with a W or the water company's initials, sitting flush with the ground. Lift the cover and you will see a vertical chamber, sometimes quite deep, with the valve at the bottom.
This external valve is your fallback for two situations. First, if your internal stopcock is seized, broken, or you simply cannot find it, the external valve lets you shut off the whole supply from outside. Second, if you are having the internal stopcock replaced, the external valve is often what isolates the supply so the work can be done dry.
- Locate it before you need it. Find the cover now, on a calm day, and check you can lift it. In older properties the chamber can be full of soil, leaves, or debris, so clearing it out in advance is worthwhile.
- Understand the valve at the bottom. Many external valves are deep and need a special long-reach tool, a stop tap key or crutch key, to reach and turn them. A few can be reached by hand, but many cannot. It is worth having, or knowing you can get, the right key.
- Turn it clockwise to close. As with the internal stopcock, clockwise shuts the water off.
- Be aware of shared supplies and the boundary of responsibility. In some streets, particularly with older or shared arrangements, one external valve may serve more than one property, and the section from the boundary outward is the water company's responsibility. If the external valve is seized or the chamber is flooded, that can be a matter for the water supplier rather than a private plumber. If you are unsure, do not force it.
The external stop valve is genuinely a lifesaver when the internal one has failed, but it comes with the same warning: an external valve that has never been touched can be just as seized as an internal one, and it is often harder to reach and harder to replace. Testing it, or at least confirming you can access it, is part of being ready.
Test your stopcock before you need it
If you take one thing from this article, take this: test your stopcock on an ordinary calm day, not in an emergency. The whole value of a stop tap is that it works the moment you reach for it, and the only way to know it will is to have tried it recently.
A simple routine, perhaps twice a year, is enough:
- Locate your internal stopcock and make sure the area around it is clear and reachable.
- Turn it fully off, gently, and check that the cold tap at the kitchen sink runs dry within a minute or two. That confirms the valve actually closes and seals.
- Turn it back on, then close it a fraction of a turn from fully open. Leaving a valve at full travel in either direction is what encourages it to seize there.
- While you are at it, check for any weeping around the spindle, and note anything stiff or reluctant.
- Confirm you know where the external stop valve is and that you can lift its cover.
This ten-minute check is what turns a potential flood into a non-event. A stopcock that has been exercised recently will almost always turn when you need it. A stopcock that has sat untouched for fifteen years is the one that seizes at the worst possible moment. Exercising the valve occasionally is genuinely the best insurance you have, and it costs nothing but a few minutes.
What to do right now if water is pouring out
If you are reading this because water is escaping and you need to act, work quickly and in order:
- Go straight to the internal stopcock and turn it clockwise to close. If it turns and the water slows, you have contained it.
- If it is seized or snaps, go to the external stop valve outside and close that instead. Have a stop tap key ready if the valve is deep.
- If you cannot shut the water off at either point, catch and contain what you can, move valuables and electricals clear, and get a plumber out urgently.
- If water is anywhere near electrics, keep clear and treat it as a safety hazard first.
When you need someone quickly, our emergency plumber London team covers this exact situation: a leaking or seized stopcock, a burst pipe with no working shut-off, or a stop tap that has failed mid-emergency. We give you an honest arrival window rather than a vague promise, and we agree the price with you before we travel, so there are no surprises on the doorstep while you are already dealing with a flood. If your stopcock is stiff or weeping but not yet an emergency, the calmer and cheaper path is to have it looked at, and very likely replaced with a modern lever valve, before the day you actually need it.
Frequently asked questions
Why won't my stopcock turn off the water?
The most common reason is that the valve has seized. Years of limescale and corrosion, made worse in London's hard water, can lock the spindle solid, especially if the valve has not been turned in a long time. A second possibility is that the handle turns but the internal washer or mechanism has worn away or detached, so the valve no longer seals even though it moves. If gentle pressure does not free it, do not force it, as an old brass spindle can shear off. Use the external stop valve outside as a backup and have the internal valve replaced.
How do I stop my stopcock leaking around the handle?
Water weeping from around the spindle means the gland seal has worn. Often you can improve it by tightening the gland nut, the nut just below the handle, a small amount, perhaps a quarter turn, with a spanner. That compresses the packing tighter around the spindle and can stop a minor weep. Do not overtighten, or the handle becomes hard to turn. If tightening does not fix it, the packing needs renewing, which is a small job best done with the water isolated, and is worth handing to a plumber if you are not confident.
Should I use a wrench to free a stiff stopcock?
No, not as a first move. Adding leverage with a wrench is exactly what snaps corroded brass spindles, turning a stiff valve into a broken one with no working shut-off. Start with steady hand pressure, work the handle in small movements both ways to break up the deposits, and give any easing fluid time to soak in. If gentle effort over a reasonable time does not free it, the valve has told you it needs replacing rather than forcing.
Where is my external stop valve and how do I use it?
The external stop valve, also called the boundary stopcock, is usually under a small cover in the pavement or footpath outside your home, or just inside the boundary near the front wall or gate. Lift the cover and you will see a chamber with the valve at the bottom. Many are deep and need a stop tap key, a long-reach tool, to turn them. Turn it clockwise to shut off the whole supply. Find and test access to it now, because the chamber can be full of soil or debris, and note that shared supplies and the section beyond the boundary can be the water company's responsibility.
How much does it cost to replace a stopcock in London?
Typical UK trade cost-guide ranges for replacing an internal stopcock tend to sit around 100 to 250 pounds including parts, though awkward access, corroded pipework, or the need to arrange an external isolation can push it higher. Most plumbers now fit a quarter-turn lever valve, which does not seize or weep the way old brass screw-down valves do. Because the true cost depends on what the job actually involves, the honest approach is to look at it first. We agree the price with you before we travel rather than quoting blind.
How often should I test my stopcock?
About twice a year is a sensible routine. Turn the valve fully off, gently, check the kitchen cold tap runs dry within a minute or two, then turn it back on and leave it a fraction of a turn back from fully open so it does not seize at full travel. While you are there, check for weeping around the spindle and confirm you can access the external stop valve. This short check is the single best way to make sure the valve actually works on the day you need it, rather than discovering it is seized during a flood.